Table of Contents
- Overview
- What is a deployment?
- Rollbacks
- Deployment Strategies
- How It Works in Practice
- Summary
- References
Overview
Recently, a payment gateway SaaS I follow on their build-in-public journey went down for a full day while migrating from v1 to v2. Several customers were unable to process sales. The problem? They did a Big Bang deployment: they shut down the old version and spun up the new one with no gradual rollout and no rollback strategy.
That’s what motivated me to write this article about better ways to deploy critical applications.
By the way, a great read I highly recommend is the article by Matheus Fidelis, Principal Engineer at Itaú, which was a major reference for my own post.
What is a deployment?
A deployment is the process of making a new version of an application available to end users. It involves everything from infrastructure updates to code changes.
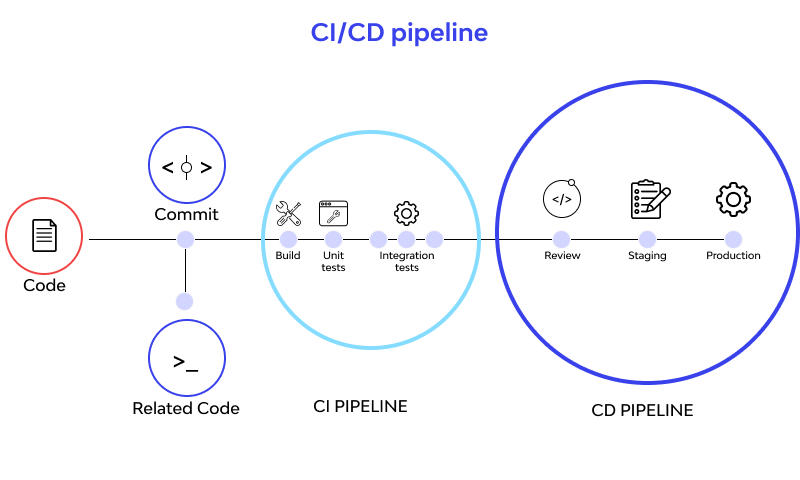
In modern systems, when a developer makes changes to the source code, the deployment process goes through two stages:
CI (Continuous Integration): The validation stage. Runs automated tests, linting, code analysis, secret detection, etc. If anything fails, the deploy is blocked.
CD (Continuous Delivery/Deployment): The deploy stage. Handles compilation, building the application, creating Docker images, and deploying to environments after CI passes successfully. When CD finishes, the source code is in production and available to users.
Common tools for CI/CD: Jenkins, GitHub Actions, GitLab CI.
Environments
It’s important to note that we have different code environments:
- Development: The local environment used by developers. Usually a simpler version of the production system, running on a single machine.
- Staging: A replica of production where changes are tested before being deployed to production.
- Production: The real environment where end users access the application.
Typical flow: Development → Staging → Production.
In this article, when I talk about deployment I mean the transition from Staging to Production, where code is actually made available to end users.
Rollbacks
Just as important as deploying is being able to undo it when things go wrong. Rollback is the process of reverting to a previous stable version.
As a system grows in complexity, it’s impossible to cover every case with tests or predict every interaction. That’s why critical systems need the ability to roll back quickly when failures occur (two certainties in life: death and breaking production).
The payment gateway I mentioned had no efficient rollback strategy. When the problem was identified, they couldn’t revert quickly, resulting in a full day of downtime.
Deployment Strategies
There are different deployment strategies, each with specific trade-offs around complexity, resource consumption, and rollback time.
I’ll use an analogy from Matheus Fidelis here because I find it really helpful:
Compare deploying an application to a bakery that wants to change its bread recipe
Big Bang Deployment
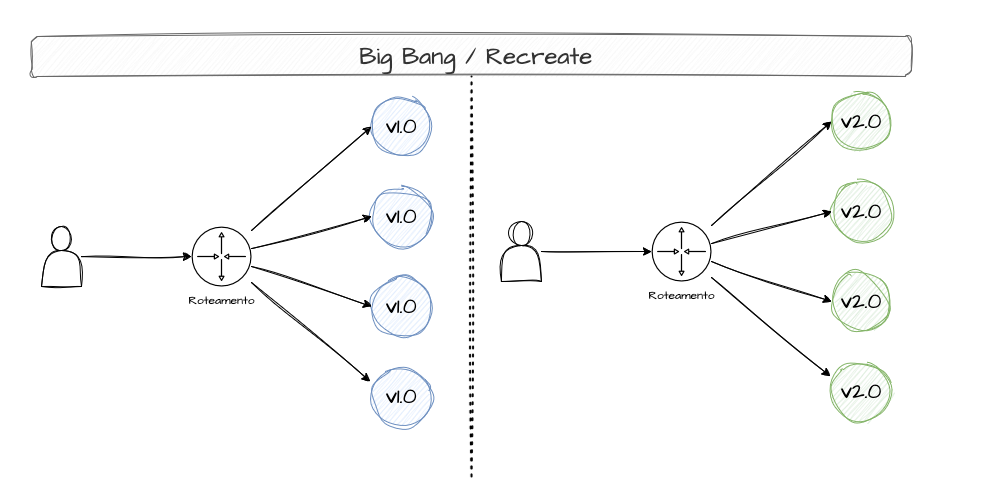
A Big Bang Deployment — also called Recreate Deployment — is a strategy that consists of rebuilding the entire system all at once, without intermediate testing or customer feedback. Simply swap the old version for the new one with no gradual transition. This can be dangerous because if the new version has any bugs, every customer will be affected.
In the bakery analogy, this is like a baker switching the bread recipe overnight. No taste tests, no feedback analysis. The next day, customers might hate the new bread and you'd have to replace the entire batch all over again
Although it’s the riskiest way to deploy, for simple projects or systems that can’t run two versions simultaneously, this strategy can work. In the payment gateway’s case, Big Bang was not the right choice — it was a critical system.
Blue/Green Deployment
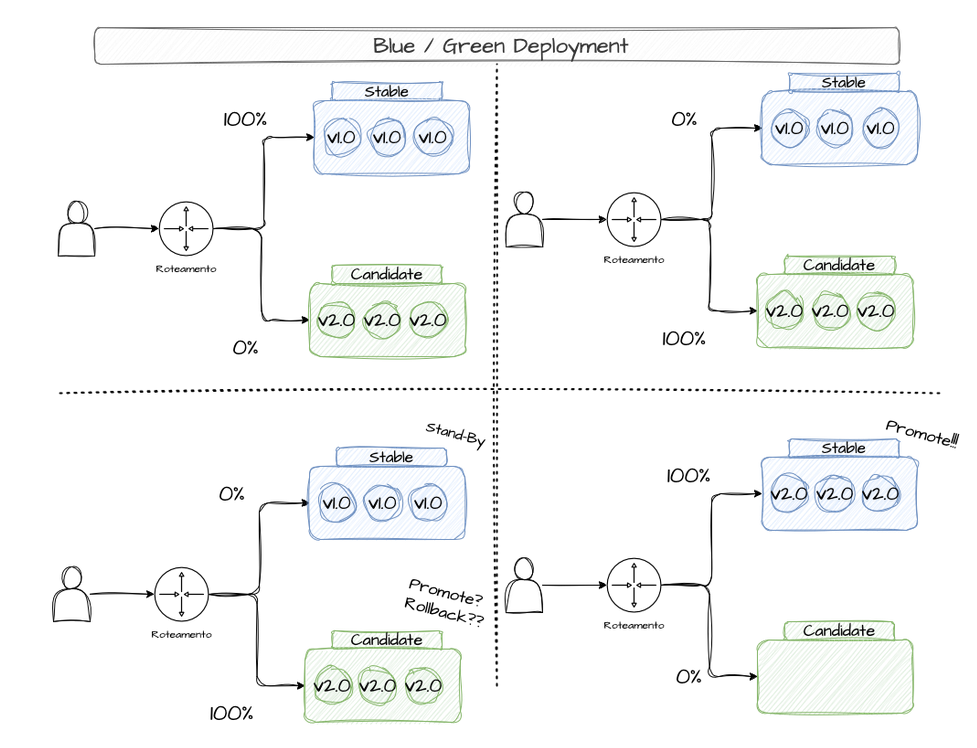
Blue/Green Deployment is a strategy that prioritizes availability during new version rollouts and enables fast rollbacks if needed. With Blue/Green, you maintain two identical environments: Blue (the current, stable version) and Green (the new version) — think of “environment” as the infrastructure needed to keep a system running. This approach lets you run tests against the Green version before going live. If something goes wrong, the Blue version is still running and users won’t notice a thing. When Green is stable enough, production traffic is switched from Blue to Green instantly via a DNS change. The Blue (stable) version is kept around for a while in case issues arise (in which case you just flip DNS back). If everything goes well, the Blue versions are deleted and Green becomes the new stable.
In the bakery analogy, this is like the baker preparing two batches of bread — one with the old recipe and one with the new. The old batch is what customers buy while the new batch is tested by staff to check flavor, ingredients, and production method. If the new batch passes, it's put out for customers — but the old batch stays in the kitchen just in case customers don't like it, so the swap can happen quickly
Blue/Green does have downsides. Maintaining two identical environments consumes resources and adds complexity, especially for complex systems with two versions running simultaneously.
Canary Release
A Canary Release is a gradual deployment where the new version is released to only a small percentage of users. If everything goes well, the percentage increases progressively. Production traffic is split between the old version (stable) and the new version — the canary (hence the name Canary Release).
If the canary version has bugs, only a small fraction of users are affected and rolling back is easier. Once the canary is confirmed stable, all production traffic is directed to it. An example of a canary release:
- Ship a new feature and release it to 1% of users.- Monitor user behavior. If nothing breaks, release to 5% of users.- Monitor user behavior. If nothing breaks, release to 20% of users.- ...- Release to 100% of users.Or another approach:
- Release the new feature to tier 1 users.- Monitor behavior. If nothing breaks, release to tier 2 users.- ...- Release to all users.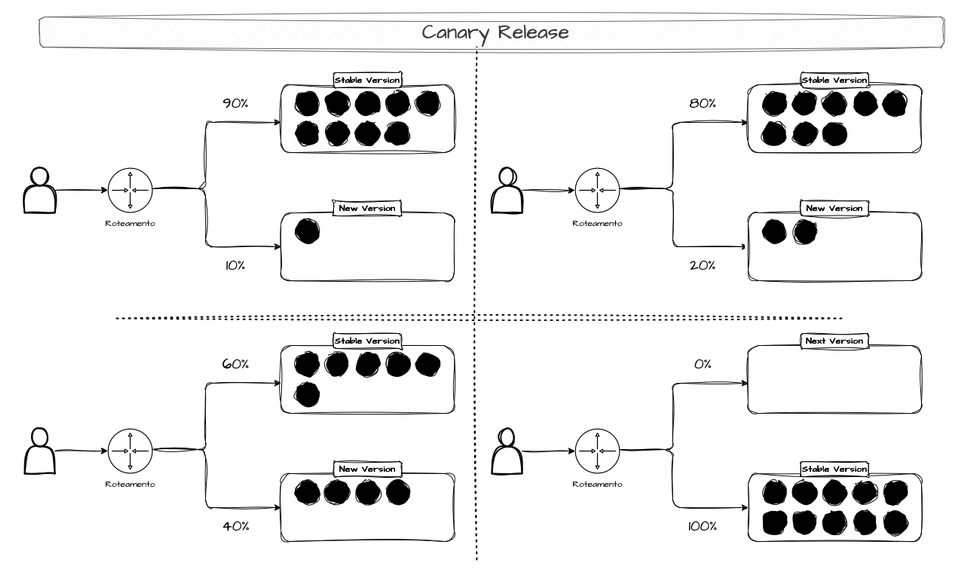
In the bakery analogy, this is like the baker adding a few new-recipe breads alongside the old ones to see if customers like them. If no one complains, more and more new-recipe breads are gradually added. This process can take days or weeks until all the bread is the new recipe. If complaints come in, you can go back to the old version
This type of deploy is used by large companies like Netflix to validate changes as thoroughly as possible. If something goes wrong, the blast radius is smaller.
However, this strategy has downsides: long deploy times, maintaining two versions of the same system at once, and the time needed for validation and observability.
Rolling Updates
This deployment strategy promotes a gradual update of a system’s version, shutting down older versions as the new ones become stable.
In the bakery analogy, this is like the baker replacing old-recipe bread as customers buy it — restocking shelves with the new recipe until all the bread is the new version
There’s often confusion about the differences between rolling updates, canary releases, and blue/green deployments. With rolling updates, there are no intermediate validations and no fine-grained traffic control. It’s simply version-by-version replacement.
Example: Say our app always needs 8 replicas. How do we update from v1 to v2 with rolling updates?- We have 8 replicas running v1.- We have 6 replicas on v1 and 2 replicas on v2.- We have 4 replicas on v1 and 4 replicas on v2.- We have 2 replicas on v1 and 6 replicas on v2.- We have 8 replicas on v2.To ensure the app stays available while updating two replicas at a time, 2 extra replicas are created to always guarantee at least 8 replicas are running.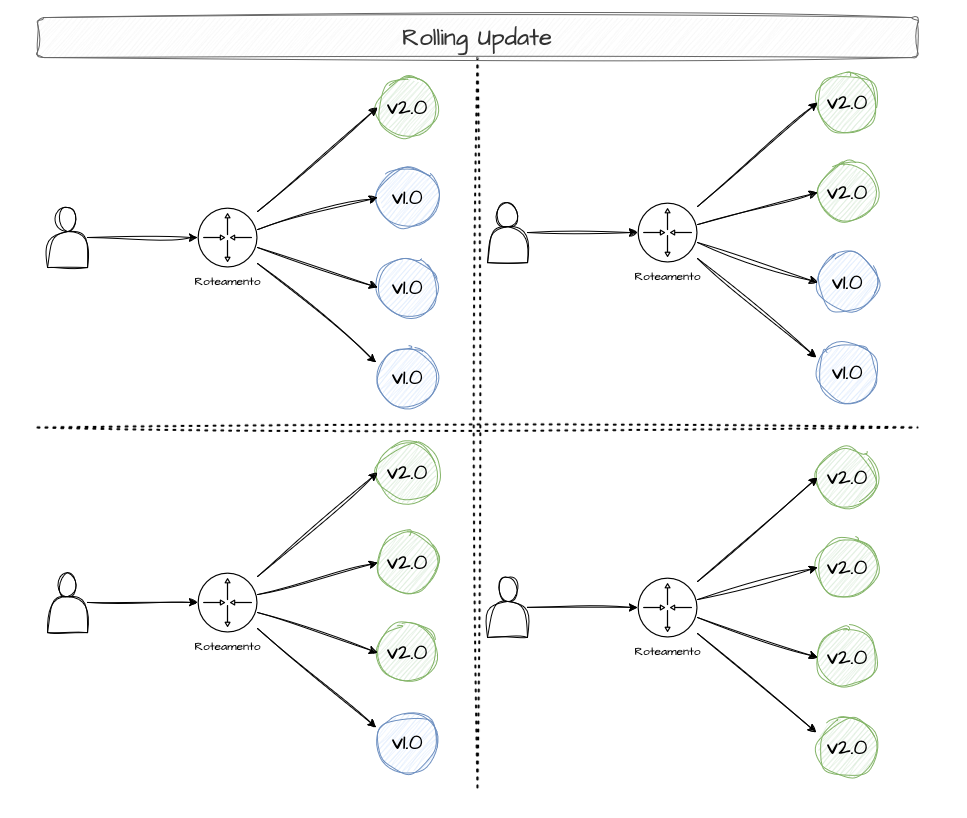
Feature Flags (Feature Toggles)
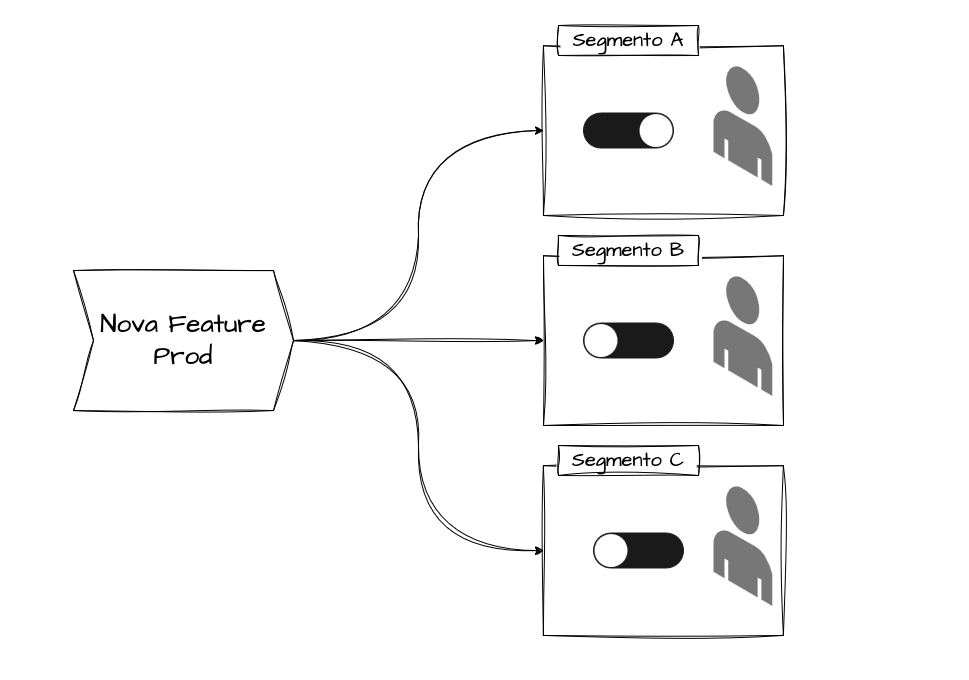
Here you deploy code with features disabled. Those features are enabled/disabled via configuration (flags).
An example: say we want to test a new payment feature for VIP customers. The updated code already has all the logic for this feature, but it’s disabled by a flag. When we want the new functionality to go live, we simply flip the flag and the already-deployed code starts executing.
In other words, feature flags allow rolling out new functionality in a controlled way. After enabling a feature, you observe user behavior or potential errors. If something goes wrong, just flip the flag back via configuration — no extra deploys or rollbacks needed.
Feature flags are very flexible and can be used to test functionality segmented by customer type, category, service, and more.
How does a feature flag work?
A feature flag works through a check that the application makes (at runtime) to decide whether or not to execute a given block of code. There are different ways to implement this check:
1. Centralized Server (Remote Config): The application queries an external server to check the flag state:
// On each request or periodically, query the serverconst flagStatus = await fetch('https://feature-flags.api.com/flags/new_checkout');if (flagStatus.enabled) { // execute new code}Advantages: Instant changes without redeploy, centralized control.
Disadvantages: Depends on external service, additional latency.
2. Config File: The application reads a local file that can be updated without redeployment:
features: new_checkout: true ai_recommendations: falseAdvantages: No external dependencies, faster.
Disadvantages: Requires server access to update the file.
3. Environment Variables: Configuration via environment variables read at startup:
FEATURE_NEW_CHECKOUT=trueFEATURE_AI_RECOMMENDATIONS=falseAdvantages: Simple, standard on many platforms (Heroku, Docker).
Disadvantages: Requires application restart to change.
4. Feature Flag Services (Split.io, LaunchDarkly, etc): Specialized platforms that provide SDKs to manage flags with advanced features like targeting (by user, country, etc.), gradual rollout, metrics, and A/B testing. These platforms maintain a server that the application queries to get flag states.
How It Works in Practice
I’d be lying if I said I know how to implement every one of these deployment modes across every system and architecture. But to avoid staying purely theoretical, let’s look at how to configure different deployment types using Kubernetes.
Kubernetes
What is Kubernetes? It’s a container orchestration platform that automates the deployment, scaling, and management of containerized applications.
Basic concepts:
- Pod: The smallest unit in Kubernetes. A pod runs one or more containers of your application.
- Deployment: The configuration that tells Kubernetes how your application should run (how many replicas, which version, deploy mode, etc).
- Replica: A copy of your application running in a pod. If you have 10 replicas, that means 10 pods running your application.
- Service: The configuration responsible for request routing used by Kubernetes and access from the internet or other services. There are many other concepts, but I think these are the main ones you need to understand the code below.
Rolling Updates (Kubernetes Default)
apiVersion: apps/v1 # Kubernetes API version we're usingkind: Deployment # Resource type: a Deployment (deploy configuration)metadata: name: my-app # Name of our deploymentspec: replicas: 10 # We want 10 copies (pods) of the app running strategy: type: RollingUpdate # Strategy: use rolling updates rollingUpdate: maxSurge: 2 # Maximum EXTRA pods during update (can have 12 total) maxUnavailable: 1 # Maximum pods that can be unavailable (minimum of 9) template: # Template: how each pod should be created spec: containers: - name: app # Container name inside the pod image: my-app:v2.0 # Docker image to use (version 2.0 of our app) readinessProbe: # Health check: K8s only routes traffic if this passes httpGet: path: /health # Makes a GET request to /health port: 8080 # On port 8080 initialDelaySeconds: 5 # Wait 5 seconds before the first check periodSeconds: 5 # Check every 5 secondsExplanation:
Imagine you have 10 pods running version 1.0 of your application. When you deploy version 2.0:
-
Kubernetes creates 2 new pods with version 2.0 (maxSurge: 2)
- Now you have: 10 pods v1.0 + 2 pods v2.0 = 12 pods total
-
Kubernetes checks if the new pods are healthy
- Makes requests to
/healthon the new pods - Only continues if it gets an HTTP 200 (success) response
- Makes requests to
-
Removes 1 old pod from version 1.0 (maxUnavailable: 1)
- Now you have: 9 pods v1.0 + 2 pods v2.0 = 11 pods total
-
Repeats the process until all 10 pods are on version 2.0
- Creates more v2.0 pods → checks health → removes v1.0 pods
- The cycle continues gradually and in a controlled manner
Availability guarantee: At no point do we have fewer than 9 pods running (10 - maxUnavailable). This ensures your application keeps handling requests throughout the deploy.
Commands to apply and manage:
# Apply the changes defined in the YAML filekubectl apply -f deployment.yaml
# Watch the rollout progress in real timekubectl rollout status deployment/my-app
# Roll back to the previous version if something goes wrongkubectl rollout undo deployment/my-appBlue/Green with Kubernetes
With Blue/Green, we maintain two complete deployments running at the same time and a Service that decides which one receives traffic.
What is a Service? Think of it as a “doorman” that receives all user requests and decides which pod to forward them to. It uses labels to know which pods to pick.
# ========================================# BLUE DEPLOYMENT (Current Version - v1.0)# ========================================apiVersion: apps/v1kind: Deploymentmetadata: name: my-app-blue # Name of the blue deployment labels: version: bluespec: replicas: 5 # 5 pods running the old version template: metadata: labels: app: my-app # Label that identifies the application version: blue # Label that identifies this as the blue version spec: containers: - name: app image: my-app:v1.0 # Version 1.0 (old/stable)
---# ========================================# GREEN DEPLOYMENT (New Version - v2.0)# ========================================apiVersion: apps/v1kind: Deploymentmetadata: name: my-app-green # Name of the green deployment labels: version: greenspec: replicas: 5 # 5 pods running the new version template: metadata: labels: app: my-app # Same app label version: green # Label that identifies this as the green version spec: containers: - name: app image: my-app:v2.0 # Version 2.0 (new/under testing)
---# ========================================# SERVICE (Traffic Controller)# ========================================apiVersion: v1kind: Servicemetadata: name: my-app-servicespec: selector: app: my-app # Selects pods with label "app: my-app" version: blue # And with label "version: blue" # RESULT: All traffic goes to BLUE pods ports: - port: 80 # Service listens on port 80 targetPort: 8080 # Forwards to port 8080 of the podsHow the Blue → Green switch works:
# Step 1: Create the GREEN deployment (new version)# This creates 5 new pods with v2.0, but NO traffic goes to them yetkubectl apply -f deployment-green.yaml
# Step 2: Test GREEN internally before going live# Creates a local tunnel to access green without going through the Servicekubectl port-forward deployment/my-app-green 8080:8080# Now you can test http://localhost:8080 and validate everything is OK
# Step 3: Instant traffic switch (BLUE → GREEN)# Changes the Service selector from "version: blue" to "version: green"# From this moment, ALL traffic goes to GREENkubectl patch service my-app-service -p '{"spec":{"selector":{"version":"green"}}}'
# Step 4: Rollback if something goes wrong (GREEN → BLUE)# Reverts the selector to "version: blue"# Traffic instantly returns to the old versionkubectl patch service my-app-service -p '{"spec":{"selector":{"version":"blue"}}}'
# Step 5 (optional): After GREEN is stable, delete BLUEkubectl delete deployment my-app-blueFlow visualization:
Initial State:[Users] → [Service: version=blue] → [5 BLUE pods v1.0] ✓ Receiving traffic [5 GREEN pods v2.0] ✗ No traffic
After the Switch:[Users] → [Service: version=green] → [5 BLUE pods v1.0] ✗ No traffic (backup) [5 GREEN pods v2.0] ✓ Receiving trafficCanary Release with Kubernetes
With Canary, both versions receive traffic at the same time, but the new version (canary) only gets a small percentage. The difference from Blue/Green is that here we split traffic proportionally using the number of replicas.
How does traffic splitting work? The Service distributes requests evenly across ALL pods with the label app: my-app. If we have 9 stable pods + 1 canary pod = 10 total pods, then approximately 10% of traffic goes to the canary.
# ========================================# STABLE DEPLOYMENT (Stable Version - v1.0)# ========================================apiVersion: apps/v1kind: Deploymentmetadata: name: my-app-stablespec: replicas: 9 # 9 pods = 90% of traffic (9 out of 10 total) template: metadata: labels: app: my-app # Label shared with canary track: stable # Specific label for identification spec: containers: - name: app image: my-app:v1.0 # Version 1.0 (stable)
---# ========================================# CANARY DEPLOYMENT (New Version - v2.0)# ========================================apiVersion: apps/v1kind: Deploymentmetadata: name: my-app-canaryspec: replicas: 1 # 1 pod = 10% of traffic (1 out of 10 total) template: metadata: labels: app: my-app # Same label, Service picks both track: canary # Specific label for identification spec: containers: - name: app image: my-app:v2.0 # Version 2.0 (being tested with real users)
---# ========================================# SERVICE (Traffic Balancer)# ========================================apiVersion: v1kind: Servicemetadata: name: my-appspec: selector: app: my-app # Selects BOTH: stable AND canary # We don't filter by "track", so it picks both ports: - port: 80 targetPort: 8080Gradual canary progression:
# ========================================# Phase 1: 10% canary (testing with a small group)# ========================================kubectl scale deployment/my-app-canary --replicas=1 # 1 canary podkubectl scale deployment/my-app-stable --replicas=9 # 9 stable pods# Total: 10 pods → Canary gets ~10% of traffic# Monitor logs, metrics, errors. If all good, proceed
# ========================================# Phase 2: 50% canary (confidence is growing)# ========================================kubectl scale deployment/my-app-canary --replicas=5 # 5 canary podskubectl scale deployment/my-app-stable --replicas=5 # 5 stable pods# Total: 10 pods → Canary gets ~50% of traffic# Keep monitoring. If still stable, finish the rollout
# ========================================# Phase 3: 100% canary (new version becomes the default)# ========================================kubectl scale deployment/my-app-canary --replicas=10 # 10 canary podskubectl scale deployment/my-app-stable --replicas=0 # 0 stable pods# Total: 10 pods → Canary gets 100% of traffic# After confirmation, rename canary to stable and delete the old deployment
# ========================================# Rollback in case of a problem (any phase)# ========================================kubectl scale deployment/my-app-stable --replicas=10 # Restore stable to 100%kubectl scale deployment/my-app-canary --replicas=0 # Remove canaryProgression visualization:
Phase 1 (10%):[Users] → [Service] → [9 STABLE pods v1.0] ← 90% of traffic [1 CANARY pod v2.0] ← 10% of traffic
Phase 2 (50%):[Users] → [Service] → [5 STABLE pods v1.0] ← 50% of traffic [5 CANARY pods v2.0] ← 50% of traffic
Phase 3 (100%):[Users] → [Service] → [0 STABLE pods v1.0] [10 CANARY pods v2.0] ← 100% of trafficAdvantage: If v2.0 has a critical bug, only 10% of users are affected in Phase 1. With Blue/Green, it would be 100%.
Feature Flag Platforms
Feature flags don’t depend on Kubernetes or any specific infrastructure. They’re implemented in the application code and controlled through external configuration.
How does it work? You deploy the code with ALL functionality (old and new), but use conditionals (if/else) to decide which one to run based on a flag. That flag can be changed without a new deploy.
Split.io (Professional Platform)
Split.io is a SaaS platform that manages feature flags centrally. It offers a dashboard, metrics, advanced targeting, and gradual rollout.
# Python - Split.io usage examplefrom splitio import get_factory
# Connect to the Split.io platform using your API keyfactory = get_factory('YOUR_SDK_KEY')split = factory.client()
# Define user attributes for targeting# You can activate features only for premium users, specific countries, etc.attributes = { 'user_id': '12345', # User's unique ID 'premium': True, # Is the user premium? 'country': 'US' # User's country}
# Ask Split.io: is the 'new_recommendation_engine' feature ON or OFF# for this specific user?treatment = split.get_treatment('user-12345', 'new_recommendation_engine', attributes)
# Based on the response, execute different codeif treatment == 'on': # Feature ENABLED: use the new AI engine recommendations = get_ai_recommendations()elif treatment == 'off': # Feature DISABLED: use the old system recommendations = get_legacy_recommendations()else: # Safety fallback in case Split.io is down recommendations = get_default_recommendations()Real-world example:
- You deploy the code above to production
- In the Split.io dashboard, you configure: “enable for 10% of premium users in the US”
- Split.io decides which users see the new feature; you just watch the metrics
- If it works well, gradually increase to 25%, 50%, 100%
Simple Feature Flags (DIY Implementation)
For smaller projects or simple cases, you can roll your own feature flag system without external platforms:
Example 1: Simple Feature Flag (On/Off)
features: new_checkout: true # true = enabled, false = disabled dark_mode: falseconst fs = require('fs');const yaml = require('js-yaml');
// Load the config filefunction loadConfig() { const file = fs.readFileSync('./config/features.yaml', 'utf8'); return yaml.load(file);}
// Check if a feature is enabledfunction isEnabled(flagName) { const config = loadConfig(); return config.features[flagName] || false;}
// Usage in codeif (isEnabled('new_checkout')) { renderNewCheckout(); // New version} else { renderOldCheckout(); // Old version}Advantages:
- Extremely simple
- Instant changes: edit the YAML and save
- Rollback: change
truetofalse
Summary
The right deployment strategy depends on context: application criticality, available resources, and risk tolerance. Critical applications should avoid Big Bang and favor strategies with fast rollback like Blue/Green or Feature Flags.
The payment gateway case shows what happens when you don’t have a proper strategy in place. With Blue/Green, Rolling Updates, or Canary, the impact would have been drastically smaller.